
MongoDB is one of the most popular NoSQL (Non-Relational Structured Query Language) databases currently out, because it does not demand all the strict organization that SQL requires. It allows for rapid creation of databases that can be dynamically changed during development. The advantage of NoSQL resides in its complete lack of organizational requirements. This allows databases to be changed dynamically during development or even in production.
MongoDB is a document based NoSQL database. The highest organization level is the database. Collections are contained in databases, similar to tables in SQL, which are used to organize the data into similar categories. The lowest level are documents, which house the actual data and are stored in collections. MongoDB documents are organized in a JSON-like format. It’s a key-value pair, with the left-side being the field name and the right-side being the field value. The example below may make the layout of MongoDB easier to understand.

To get started, begin by creating an account on MongoDB.
You’ll be taken to the account setup section. You can input whatever makes sense for you in organization and project name. Preferred language should be whatever programming language your project is going to be in or whatever you’re most comfortable with. This can always be changed later so there’s no pressure on a decision now. If you aren’t sure what to pick, JavaScript is always a good choice.

After account setup, MongoDB will ask how you want to create the cluster. A cluster is essentially the server that will be hosting any databases you create. Since we’re just learning, ensure to select the free cluster, the one highlighted yellow in the image below to the right.

For our starting shared cluster, there won’t be a massive difference between AWS, Google Cloud, or Azure. When it comes to a paid dedicated cluster, the cloud services will have different rates, speeds, and locations among other aspects. However, for our purposes, any cloud service provider will do. The only input definitely worth changing is the cluster name, which is highlighted in yellow below. You will want to choose a better name than ‘Cluster0’. Once that’s filled out, select “Create Cluster” at the bottom of the screen.

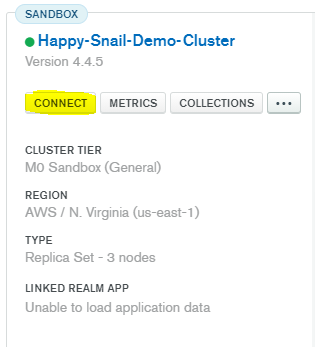
It will take a few minutes for the cluster to be created. Once it’s created, let’s get connected to the cluster. Select connect.
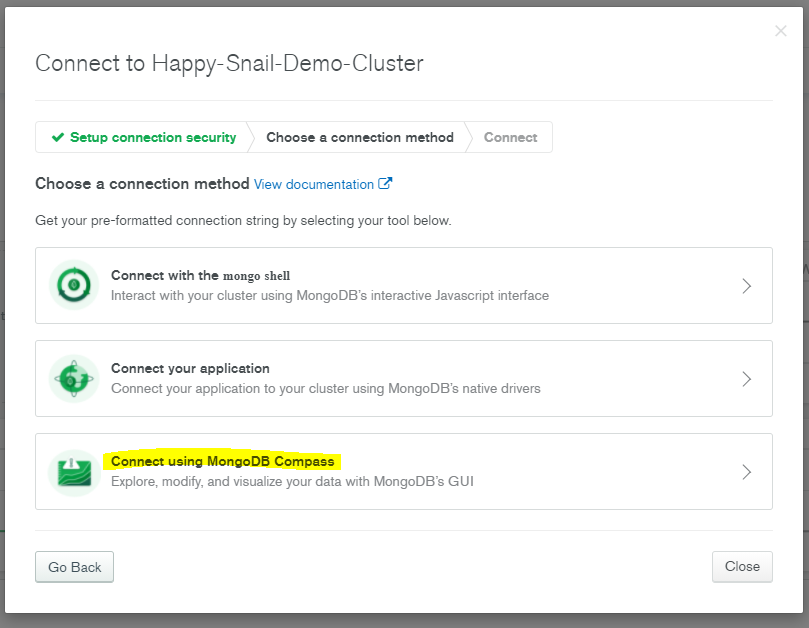
You’ll want to add your current IP address as well as a database user and password in order to set up firewall access. Once those are filled in, select “choose a connection method” in the bottom right corner.

Select: “Connect using MongoDB Compass.”
Make sure to copy the connection string, you’ll need this to connect to your cluster. The connection string contains the database user and password and states where the cluster is located in the cloud. You’ll also see a recommendation to install MongoDB Compass, which is the desktop GUI for MongoDB. I highly recommend it because it’s much faster than the web interface and it will give a better experience for creating collections or inserting/updating documents.
Download Compass now, ensuring to select the correct version of your operating system.

After installing and running the program, you’ll get a basic screen asking to paste your connection string. If you forgot to copy the connection string from before, just click the connect button on your cluster again and you’ll receive the connection string once more. Select “Connect” when you’ve filled it in.
Note: Ensure that you replace <password> in the connection string with your actual password, no angle brackets.

After a successful connection the current databases will be listed. Select “create database,” so we can create our own.

Fill in the database name and the collection name and select create database.

Back at the database list, select your newly created database.

Inside your database, you’ll see a list of collections; it will only contain the one collection we just created. There is a create collection button if you ever want to make additional collections. For now, let’s select “TestCollection”.

We have our new collection, but there’s no data in it! Let’s change that now. Select the “add data” button and choose import file.

Download this JSON file and choose it as the file to upload. Select JSON as the input file type and check the option to stop on errors. Then select import.

Now, we have some data to look at. MongoDB refers to each data item as a document. As discussed before, each document is a JSON-like object. It makes the document human readable while also being simple to programmatically perform create-read-update-delete (CRUD) operations.
The _id field is the only field that must be unique among the collection. If you look at any of the data in the JSON file we uploaded, you’ll notice that none of them have the _id field. That’s because, similar to SQL, MongoDB will automatically assign an ObjectId that is guaranteed to be unique. The other fields can be any data type you want such as integers, floats, or strings, and it can even be organized into arrays.
Note: I got all this mock data from Mockaroo. It’s a great way to get test data that has realistic information in it.

In order to properly showcase the dynamic nature of NoSQL, let’s insert a new document manually into the database. Except, this new document will not share the same fields as all the other documents.
See the example below: select add data then insert new document. Put the JSON object below into the insert box.
{
“first_name”: “Chucky”,
“last_name”: “Ray”,
“state”: “NY”,
“occupation”: “doll”
}

The filter feature is a great way to parse through all the data in your collection; it’s similar to queries in SQL.
Now we’ll filter the data through the state field searching for NY.
{ “state”: “NY” }
You’ll notice that even though the Chucky document we just inserted has different fields, it has no issues being in the same collection. It also appears from the query, so it’s a valid document.
The Chucky document shows that during development of your database, you can add hot-fixes and updates to your documents that will NOT break your database. This is in opposition to SQL, where any new fields to be added would involve a complete restructuring of the table, and of any tables that might reference the now updated table. This results in SQL database updates being an overall hassle.

This concludes our brief overview of NoSQL and MongoDB. As demonstrated, there is an amazing ability to make new updates to your database. These updates will not cause the database to crash or cause an error when inserting the new document, however, as Uncle Ben warned Peter Parker, “with great power comes great responsibility.” The dynamic and malleable environment that comes with NoSQL can quickly lead to an unorganized and unusable mess of a database. It is imperative for the developer to keep this in mind and enforce organization on the database, while utilizing the dynamic nature of NoSQL.
While we’ve only gone over NoSQL and MongoDB, keep an eye out for a future article on using the node.js library to interface with MongoDB.
Thanks for reading!
